

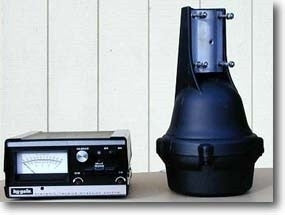
Rotor-EZ No RS-232 Kit
Rotor-EZ No RS-232 Kit
Couldn't load pickup availability
Rotor-EZ No RS-232 Kit.
Share
Easy clean Assembly that functions as advertised, Rotor EZ makes direction and break usage an easy turn of the knob with no worry about using the brake. I have no concern about rotator damage.
After installing & frequently using my 3 new Rotor EZ kits (no optional RS232's in mine) in each of my 3 Hy-Gain "Direction Controller Plus", I can honestly say that I would be extremely uncomfortable using ANY Hi-Gain rotor & ESPECIALLY my T2X Tailtwister rotor without this wonderful mod! Both my Aluma tower & rotor are now well protected from "brake button finger slips" that occur sometimes with the standard unmodified unit that can cause the brake to engage while the antenna is still in motion. The automatic 5 second brake delay feature alone is a "MUST HAVE", but wait, there's MORE safety features & "perks" gained by adding the Rotor EZ kit! Additionally, the ingenious "point & shoot" feature is really convenient & "cool to watch" when changing directions with my yagi antenna, which allows "hands free" operation after the quick rotation of the former "calibrate" potentiometer knob (now the desired direction selector) to set the desired new heading & a quick "click" of the brake button to start your beam turning all the way to the desired heading after a quick "brake un-lock safety reverse bump" in the rotation cycle to unlock a possible stuck brake which sometimes occurs in Tailtwister rotors (& DID occur once in mine prior to installation of my new Rotor EZ kits). The hands-free automatic rotation also allows the operator to take his/her eyes off of the rotor control direction meter so that the INCOMING SIGNAL STRENGTH can be observed on one's "S meter" during the rotation cycle when determining propagation paths! I have a total of 3 ham "studios" in my home (Studios A, B, & C as I call them) & I now have 3 Rotor EZ modified Hy-Gain control boxes (one in each studio) which I select in a small "doghouse" outside in my small back yard "antenna farm". The Rotor EZ circuit boards are of very high quality, & the foil/foil glue is very forgiving for having to de-solder & re-solder any "boo-boos", & still retain a professional appearance even after these mistakes are corrected! My ONLY MINOR suggestion for future kits is that it would be nice to add allowance for a couple of more seconds to the currently allowed 4 - 5 second time frame (before "command execution or time out" after dialing up the new desired direction), Sometimes old guys like me are a little slow & the timer "times out" just about 1 second before I have a chance to momentarily depress the "brake" button (now the "execute command button"). After a few practice antenna rotations by the operator however, I got pretty good at it, although on rare occasions the timer beats me & times out, requiring me to re-set the new desired direction again for the second time. BOTTOM LINE: Once you've used your Rotor EZ modified Hy-Gain rotor control, I believe that you will FEAR operating ANY Hy-Gain rotor with a standard/unmodified Hy-Gain rotor controller ever again!
Well written instructions, however download the document in word if you have poor vision like myself. Check, check and double check part orientation, soldering application and al will go well. I missed 1 solder joint and had to use eye loop to find it. That caused alot of diagnostic time. After soldering that 1 joint everything fell in place. Works very well as stated in the website. Awsome product can't wait to get the tower up now.
Robert beswick KA6PSD Arizona
This thing frees up your hands so you can "point and shoot" without holding your fingers on the rotor buttons. So smartly designed, it "rocks" the antenna back 5 degrees to free up a wind pinched rotor so it can release the brake and rotate to exactly where you set it to go. This is my 2nd unit for my 2nd rotor. I would never be without a Rotor-EZ!
TNX Wayne!
73, Dan W7RF
Kit arrived quickly and in a few days I completed the install. Overall it was a good experience.